并发工具类CountDownLatch源码解析 简介 CountDownLatch是一个同步工具类,用来协调多个线程之间的同步,比如我有很多数据需要进行分类计算,再进行汇总.为了更快的解析,则每一种类型计算都用一个线程去处理,等到所有类型计算完毕再进行汇总,这时我们就可以CountDownLatch
使用场景 1.开始执行前等待n个线程完成各自任务 :主线程在开始运行前等待n个线程执行完毕.将CountDownLatch的计数器初始化为n(new CountDownLatch(n)),每当一个任务线程执行完毕,就将计数器减1(cdl.countDown()),当计数器值变为0时,在CountDownLatch上await()的线程就会被唤醒.典型的就是启动应用程序之前,程序的必备组件/监听等都已经准备就绪了.实现多个线程开始执行任务的最大并行性 :初始化一个共享的CountDownLatch(1),将其计数器初始化为1.多个线程在开始运行前首先cdl.await(),当主线程调用countDown时,计数器变为0,多个线程就同时被唤醒.检测死锁 :使用n个线程访问共享资源,在每次测试阶段线程数量不同,查看什么情况会产生死锁
源码解析 内部类 1 2 3 4 5 6 7 8 9 10 11 12 13 14 15 16 17 18 19 20 21 22 23 24 25 26 27 28 29 30 31 32 33 34 private static final class Sync extends AbstractQueuedSynchronizer private static final long serialVersionUID = 4982264981922014374L ; Sync(int count) { setState(count); } int getCount () return getState(); } protected int tryAcquireShared (int acquires) return (getState() == 0 ) ? 1 : -1 ; } protected boolean tryReleaseShared (int releases) for (;;) { int c = getState(); if (c == 0 ) return false ; int nextc = c-1 ; if (compareAndSetState(c, nextc)) return nextc == 0 ; } } }
构造函数 1 2 3 4 5 6 7 8 public CountDownLatch (int count) if (count < 0 ) throw new IllegalArgumentException("count < 0" ); this .sync = new Sync(count); }
注:计数值count实际上是闭锁需要等待的线程数量.这个值只能在这个地方设置,没有其他地方可以设置,而且CountDownLatch也没有提供任何方法去重新设置这个值
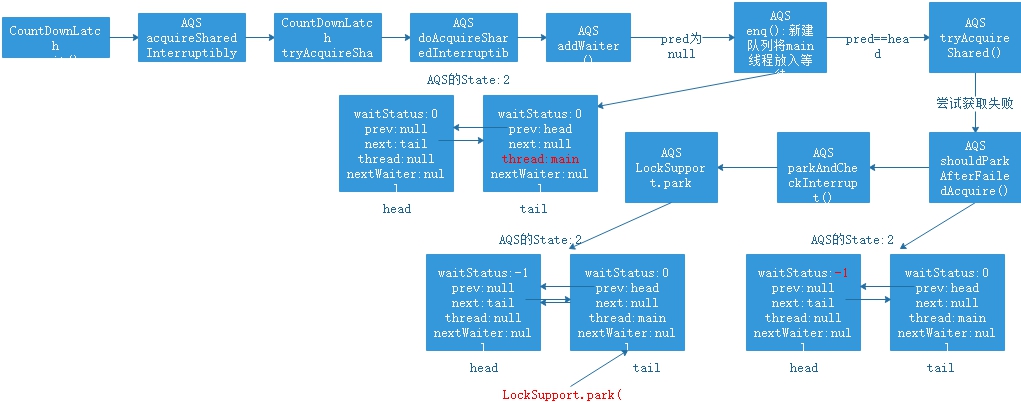
await 1 2 3 4 5 6 7 8 9 10 11 12 13 14 15 16 17 18 19 20 21 22 23 24 25 26 27 28 29 30 31 32 33 34 35 36 37 38 39 40 41 42 43 44 45 46 47 48 49 50 51 52 53 54 55 56 57 58 59 60 61 62 63 64 65 66 67 68 69 70 71 72 73 74 public void await () throws InterruptedException sync.acquireSharedInterruptibly(1 ); } public final void acquireSharedInterruptibly (int arg) throws InterruptedException { if (Thread.interrupted()) throw new InterruptedException(); if (tryAcquireShared(arg) < 0 ) doAcquireSharedInterruptibly(arg); } protected int tryAcquireShared (int acquires) return (getState() == 0 ) ? 1 : -1 ; } private void doAcquireSharedInterruptibly (int arg) throws InterruptedException { final Node node = addWaiter(Node.SHARED); boolean failed = true ; try { for (;;) { final Node p = node.predecessor(); if (p == head) { int r = tryAcquireShared(arg); if (r >= 0 ) { setHeadAndPropagate(node, r); p.next = null ; failed = false ; return ; } } if (shouldParkAfterFailedAcquire(p, node) && parkAndCheckInterrupt()) throw new InterruptedException(); } } finally { if (failed) cancelAcquire(node); } } private void setHeadAndPropagate (Node node, int propagate) Node h = head; setHead(node); if (propagate > 0 || h == null || h.waitStatus < 0 || (h = head) == null || h.waitStatus < 0 ) { Node s = node.next; if (s == null || s.isShared()) doReleaseShared(); } }
await流程图如下:
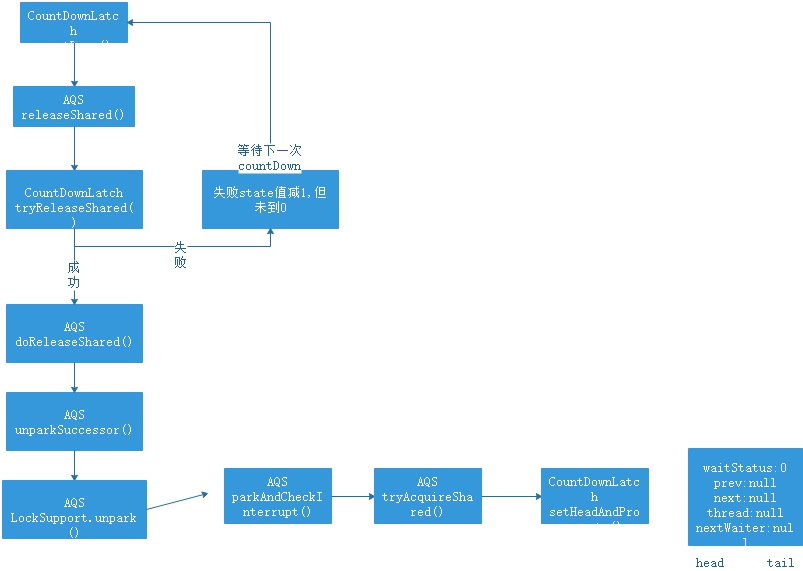
countDown 1 2 3 4 5 6 7 8 9 10 11 12 13 14 15 16 17 18 19 20 21 22 23 24 25 26 27 28 29 30 31 32 33 34 35 36 37 38 39 40 41 42 43 44 45 46 47 48 49 50 51 52 53 public void countDown () sync.releaseShared(1 ); } public final boolean releaseShared (int arg) if (tryReleaseShared(arg)) { doReleaseShared(); return true ; } return false ; } protected boolean tryReleaseShared (int releases) for (;;) { int c = getState(); if (c == 0 ) return false ; int nextc = c-1 ; if (compareAndSetState(c, nextc)) return nextc == 0 ; } } private void doReleaseShared () for (;;) { Node h = head; if (h != null && h != tail) { int ws = h.waitStatus; if (ws == Node.SIGNAL) { if (!compareAndSetWaitStatus(h, Node.SIGNAL, 0 )) continue ; unparkSuccessor(h); } else if (ws == 0 && !compareAndSetWaitStatus(h, 0 , Node.PROPAGATE)) continue ; } if (h == head) break ; } }
countDown流程图如下:
getCount 1 2 3 4 5 6 7 8 9 10 public long getCount () return sync.getCount(); } int getCount () return getState(); }
使用示例分析 对文本中每一行使用一个线程来计算,等每一行都计算完毕后就进行汇总线程的执行
1 2 3 4 5 6 7 8 9 10 11 12 13 14 15 16 17 18 19 20 21 22 23 24 25 26 27 28 29 30 31 32 33 34 35 36 37 38 39 40 41 42 43 44 45 46 47 48 49 50 51 52 53 54 55 56 57 58 59 60 61 62 63 64 65 66 67 68 69 70 71 72 73 74 75 76 77 public class DownLatchDemo2 private int [] nums; public DownLatchDemo2 (int line) this .nums = new int [line]; } public void calc (String line,int index, CountDownLatch latch) String[] nus = line.split("," ); int total = 0 ; for (String num : nus) { total += Integer.parseInt(num); } nums[index] = total; System.out.println(Thread.currentThread().getName()+" 执行计算任务" +line+"结果为:" +total); latch.countDown(); } public void sum () System.out.println("汇总线程开始执行" ); int total = 0 ; for (int i = 0 ; i < nums.length; i++) { total += nums[i]; } System.out.println("最终的结果为:" +total); } public static void main (String[] args) List<String> contents = readFile(); int lineCount = contents.size(); CountDownLatch latch = new CountDownLatch(lineCount); DownLatchDemo2 demo = new DownLatchDemo2(lineCount); for (int i = 0 ; i < lineCount; i++) { final int j = i; new Thread(new Runnable() { @Override public void run () demo.calc(contents.get(j), j, latch); } }).start(); } try { latch.await(); } catch (InterruptedException e) { e.printStackTrace(); } demo.sum(); } private static List<String> readFile () List<String> contents = new ArrayList<>(); String line = null ; BufferedReader reader = null ; try { reader = new BufferedReader(new FileReader("C:\\work\\nums.txt" )); while ((line = reader.readLine()) != null ) { contents.add(line); } } catch (Exception e) { e.printStackTrace(); } finally { if (reader != null ) { try { reader.close(); } catch (IOException e) { e.printStackTrace(); } } } return contents; } }
首先main线程会创建出nums.txt中对应行数的线程,运行后main会执行await操作,main线程会被阻塞,对应子线程会处理自己计算后执行countDown操作,当state值递减到0时main线程会被唤醒继续执行