线程通信Condition源码分析
Object类提供的线程通信–wait、notify
使用Object类的线程通信模拟生产消费者模型,具体代码如下:
1
2
3
4
5
6
7
8
9
10
11
12
13
14
15
16
17
18
19
20
21
22
23
24
25
26
27
28
29
30
31
32
33
34
35
36
37
38
39
40
41
42
43
44
45
46
47
48
49
50
51
52
53
54
55
56
57
58
59
60
61
62
63
64
65
66
67
68
69
70
71
72
73
74
75
76
77
78
79
80
81
82
83
84
85
86
87
88
89
90
91
92
93
|
public class Store {
private int count;
public final int MAX_COUNT = 10;
public synchronized void producte() {
while (count >= MAX_COUNT) {
try {
System.out.println(Thread.currentThread().getName() + "库存已满,生产者停止生产");
wait();
} catch (InterruptedException e) {
e.printStackTrace();
}
}
count ++;
System.out.println(Thread.currentThread().getName() + "正在生产中,当前库存为" + count);
notifyAll();
}
public synchronized void consume() {
while (count <= 0) {
try {
System.out.println(Thread.currentThread().getName() + "库存为0,消费者停止消费");
wait();
} catch (InterruptedException e) {
e.printStackTrace();
}
}
count --;
System.out.println(Thread.currentThread().getName() + "消费者正在消费,当前库存为" + count);
notifyAll();
}
public static void main(String[] args) {
Store store = new Store();
Producter producter = new Producter(store);
Consumer consumer = new Consumer(store);
new Thread(producter).start();
new Thread(consumer).start();
}
}
public class Producter implements Runnable {
private Store store;
public Producter(Store store) {
this.store = store;
}
@Override
public void run() {
while (true) {
store.producte();
try {
Thread.sleep(2000);
} catch (InterruptedException e) {
e.printStackTrace();
}
}
}
}
public class Consumer implements Runnable {
private Store store;
public Consumer(Store store) {
this.store = store;
}
@Override
public void run() {
while (true) {
store.consume();
try {
Thread.sleep(2000);
} catch (InterruptedException e) {
e.printStackTrace();
}
}
}
}
|
wait和notify必须放在同步代码块中执行,否则报错;wait和notify必须是持有锁对象的
Object的监视器方法需要结合synchronized关键字一起使用可以实现等待/通知模式;如果使用了显示锁lock,上述的线程通信方式就不能用了,所以显示锁要提供自己的等待/通知模式,这就是Condition
显式锁提供的线程通信–Condition使用
使用Condition方式的线程通信模拟生产消费者模型,具体代码如下:
1
2
3
4
5
6
7
8
9
10
11
12
13
14
15
16
17
18
19
20
21
22
23
24
25
26
27
28
29
30
31
32
33
34
35
36
37
38
39
40
41
42
43
44
45
46
47
48
49
50
51
52
53
54
55
56
57
58
59
60
61
62
63
64
65
66
67
68
69
70
71
72
73
74
75
76
77
78
79
80
81
82
83
84
85
86
87
88
89
90
91
92
93
94
95
| public class Store {
private int count;
public final int MAX_COUNT = 10;
private Lock lock = new ReentrantLock();
private Condition full = lock.newCondition();
private Condition empty = lock.newCondition();
public void producte() {
lock.lock();
try {
while (count >= MAX_COUNT) {
System.out.println(Thread.currentThread().getName() + "库存已满,生产者停止生产");
full.await();
}
count ++;
System.out.println(Thread.currentThread().getName() + "正在生产中,当前库存为" + count);
empty.signal();
} catch (InterruptedException e) {
e.printStackTrace();
} finally {
lock.unlock();
}
}
public void consume() {
lock.lock();
try {
while (count <= 0) {
System.out.println(Thread.currentThread().getName() + "库存为0,消费者停止消费");
empty.await();
}
count --;
System.out.println(Thread.currentThread().getName() + "消费者正在消费,当前库存为" + count);
full.signal();
} catch (InterruptedException e) {
e.printStackTrace();
} finally {
lock.unlock();
}
}
public static void main(String[] args) {
Store store = new Store();
Producter producter = new Producter(store);
Consumer consumer = new Consumer(store);
new Thread(consumer).start();
new Thread(producter).start();
}
}
public class Consumer implements Runnable {
private Store store;
public Consumer(Store store) {
this.store = store;
}
@Override
public void run() {
while (true) {
store.consume();
try {
Thread.sleep(2000);
} catch (InterruptedException e) {
e.printStackTrace();
}
}
}
}
public class Producter implements Runnable {
private Store store;
public Producter(Store store) {
this.store = store;
}
@Override
public void run() {
while (true) {
store.producte();
try {
Thread.sleep(2000);
} catch (InterruptedException e) {
e.printStackTrace();
}
}
}
}
|
notify是随机唤醒一个线程,但是Condition则可以指定线程唤醒;
Condition简介
Condition主要是为了在JUC框架中提供和Java线程通信的wait、notify、notifyAll方法类似的功能;即通过设置一个条件,在合适的时候通过调用await使一个线程沉睡并释放锁,当其他线程调用singal方法时会唤醒那个线程.condition通常视为多线程之间通信的工具
Condition自己也维护了一个队列,该队列的作用是维护一个等待signal信号的队列,两个队列的作用是不同,每个线程也仅仅会同时存在以上两个队列中的一个
示例过程:
线程1:
- 线程1调用reentrantLock.lock时,持有锁
- 线程1调用await方法,进入”条件等待队列”,同时释放锁
- 线程1获取到线程2 Signal信号,从”条件等待队列”进入到”同步等待队列”
线程2:
- 线程2调用reentrantLock.lock时,由于锁被线程1持有,进入”同步等待队列”
- 由于线程1释放锁,线程2从”同步等待队列”移除,获取到锁.线程2调用signal方法,导致线程1被唤醒
- 线程2调用reentrantLock.unlock,线程1获取锁,继续循环
条件等待队列是Condition内部自己维护的一个队列,具有以下特点
- 要加入”条件等待队列”的节点,不能在”同步等待队列”
- 从”条件等待队列”移除的节点,会进入”同步等待队列”
- 一个锁对象只能有一个”同步等待队列”,但可以有多个”条件等待队列”
| 对比项 |
Object监视器 |
Condition |
| 前置条件 |
获取对象的锁 |
调用Lock.locl获取锁,调用Lock.newCondition获取Condition对象 |
| 调用方式 |
直接调用,如:object.notify() |
直接调用,如condition.await() |
| 等待队列个数 |
一个 |
多个 |
| 当前线程释放锁进入等待状态 |
支持 |
支持 |
| 当前线程进入等待状态,在等待状态不断响应中断 |
不支持 |
支持 |
| 当前线程释放锁进入超时等待状态 |
支持 |
支持 |
| 当前线程释放锁并进入等待状态知道将来某个时间 |
不支持 |
支持 |
| 唤醒等待队列的一个线程 |
支持 |
支持 |
| 唤醒等待队列的所有线程 |
支持 |
支持 |
Condition是一个接口,其内部接口方法如下:
1
2
3
4
5
6
7
8
9
10
11
12
13
14
15
16
17
18
19
20
| public interface Condition {
void await() throws InterruptedException;
boolean await(long time, TimeUnit unit) throws InterruptedException;
long awaitNanos(long nanosTimeout) throws InterruptedException;
void awaitUninterruptibly();
boolean awaitUntil(Date deadline) throws InterruptedException;
void signal();
void signalAll();
}
|
Condition源码分析
我们在上述使用condition时都是通过lock.newCondition()去创建的,咱先看看lock的这个方法,如下:
1
2
3
4
5
6
7
| public Condition newCondition() {
return sync.newCondition();
}
final ConditionObject newCondition() {
return new ConditionObject();
}
|
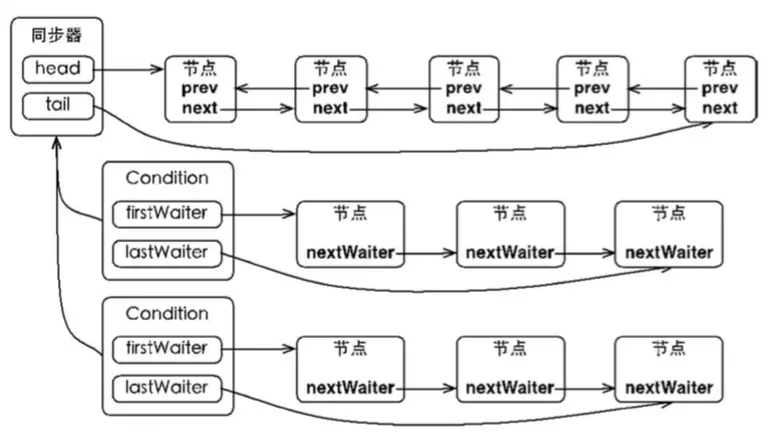
由上可知:Condition是通过sync同步类去创建的,而sync内部是直接new了ConditionObject();所以分析Condition源码就是分析ConditionObject,定位发现ConditionObject是AQS的内部类
我们在使用的时候主要是使用ConditionObject的await和signal方法
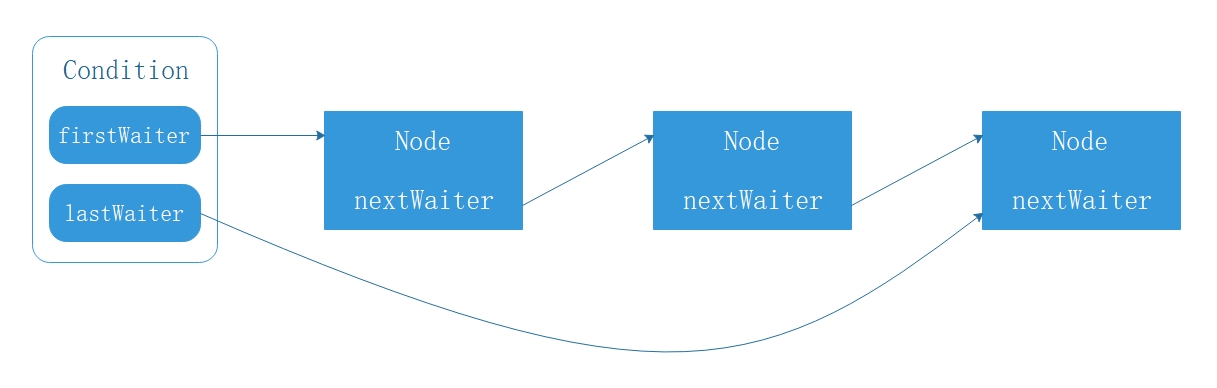
ConditionObject的等待队列是一个FIFO队列,队列的每个节点都是等待在Condition对象上线程的引用;在调用await方法,线程释放锁,将其构造成Node节点放入条件等待队列.
Condition队列的结构如下:
![Condition结构.jpg]()
AQS实质上拥有一个同步队列和多个等待队列,具体对应关系如下图所示:
![AQS同步队列与等待队列示意图.jpg]()
await方法解析
1
2
3
4
5
6
7
8
9
10
11
12
13
14
15
16
17
18
19
20
21
22
23
24
25
26
| public final void await() throws InterruptedException {
if (Thread.interrupted())
throw new InterruptedException();
Node node = addConditionWaiter();
int savedState = fullyRelease(node);
int interruptMode = 0;
while (!isOnSyncQueue(node)) {
LockSupport.park(this);
if ((interruptMode = checkInterruptWhileWaiting(node)) != 0)
break;
}
if (acquireQueued(node, savedState) && interruptMode != THROW_IE)
interruptMode = REINTERRUPT;
if (node.nextWaiter != null)
unlinkCancelledWaiters();
if (interruptMode != 0)
reportInterruptAfterWait(interruptMode);
}
|
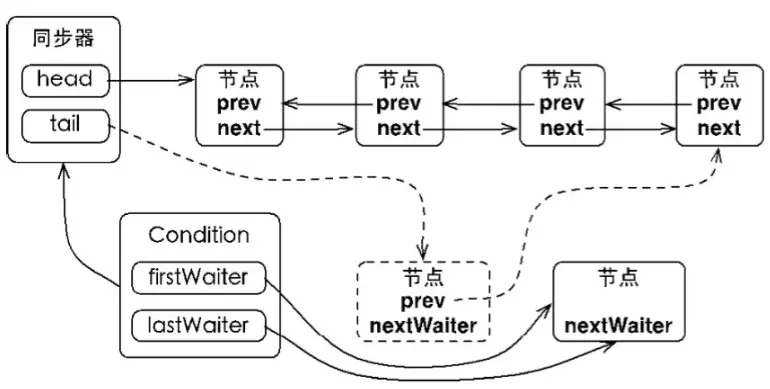
await具体流程如下:
![await流程.png]()
1.入队操作
Condition的入队操作表示将节点添加进”条件等待队列”,通过AQS的ConditionObject的addConditionWaiter方法来完成
1
2
3
4
5
6
7
8
9
10
11
12
13
14
15
16
17
18
19
20
21
22
23
24
25
26
27
28
29
30
31
32
33
34
35
36
37
38
39
40
41
42
43
44
45
46
|
private Node addConditionWaiter() {
Node t = lastWaiter;
if (t != null && t.waitStatus != Node.CONDITION) {
unlinkCancelledWaiters();
t = lastWaiter;
}
Node node = new Node(Thread.currentThread(), Node.CONDITION);
if (t == null)
firstWaiter = node;
else
t.nextWaiter = node;
lastWaiter = node;
return node;
}
private void unlinkCancelledWaiters() {
Node t = firstWaiter;
Node trail = null;
while (t != null) {
Node next = t.nextWaiter;
if (t.waitStatus != Node.CONDITION) {
t.nextWaiter = null;
if (trail == null)
firstWaiter = next;
else
trail.nextWaiter = next;
if (next == null)
lastWaiter = trail;
}
else
trail = t;
t = next;
}
}
|
2.fullyRelease释放锁操作
在加入队列之后,休眠之前,保存此时的同步状态,然后将持有的锁释放,保存同步状态用于被通知后恢复同步状态
1
2
3
4
5
6
7
8
9
10
11
12
13
14
15
16
17
18
19
20
21
22
23
24
25
26
27
28
29
| final long fullyRelease(Node node) {
boolean failed = true;
try {
long savedState = getState();
if (release(savedState)) {
failed = false;
return savedState;
} else {
throw new IllegalMonitorStateException();
}
} finally {
if (failed)
node.waitStatus = Node.CANCELLED;
}
}
public final boolean release(long arg) {
if (tryRelease(arg)) {
Node h = head;
if (h != null && h.waitStatus != 0)
unparkSuccessor(h);
return true;
}
return false;
}
|
3.节点是否在同步队列
isOnSyncQueue判断的是线程是否从等待队列移到同步队列.即等待队列在等待通知,通知线程将唤醒的节点移到AQS同步队列(具体参见signal方法解析);若不满足则进入休眠,线程进入自旋
1
2
3
4
5
6
7
8
9
10
11
12
13
14
15
16
17
18
19
20
21
22
23
24
25
26
27
28
29
30
31
|
final boolean isOnSyncQueue(Node node) {
if (node.waitStatus == Node.CONDITION || node.prev == null)
return false;
if (node.next != null
return true;
return findNodeFromTail(node);
}
private boolean findNodeFromTail(Node node) {
Node t = tail;
for (;;) {
if (t == node)
return true;
if (t == null)
return false;
t = t.prev;
}
}
|
4.获取同步状态
使线程在等待队列中获取资源,一直获取到资源后才返回(自旋获取同步状态).如果在等待过程中被中断,则返回true,否则返回false
1
2
3
4
5
6
7
8
9
10
11
12
13
14
15
16
17
18
19
20
21
22
23
24
25
26
27
28
29
30
31
32
33
34
35
36
37
38
39
40
41
42
43
44
45
46
47
48
49
50
51
52
53
54
55
56
57
58
59
60
61
62
63
64
65
66
67
68
69
70
| final boolean acquireQueued(final Node node, long arg) {
boolean failed = true;
try {
boolean interrupted = false;
for (;;) {
final Node p = node.predecessor();
if (p == head && tryAcquire(arg)) {
setHead(node);
p.next = null;
failed = false;
return interrupted;
}
if (shouldParkAfterFailedAcquire(p, node) &&
parkAndCheckInterrupt())
interrupted = true;
}
} finally {
if (failed)
cancelAcquire(node);
}
}
private static boolean shouldParkAfterFailedAcquire(Node pred, Node node) {
int ws = pred.waitStatus;
if (ws == Node.SIGNAL)
return true;
if (ws > 0) {
do {
node.prev = pred = pred.prev;
} while (pred.waitStatus > 0);
pred.next = node;
} else {
compareAndSetWaitStatus(pred, ws, Node.SIGNAL);
}
return false;
}
private final boolean parkAndCheckInterrupt() {
LockSupport.park(this);
return Thread.interrupted();
}
|
signal方法解析
唤醒condition队列中的第一个condition状态的节点(中间会检测Cancelled状态的节点并全部移除队列),将节点添加到CLH队列的末尾;设置该节点在CLH节点中前驱节点的状态为singal(若前驱节点的状态为Cancelled或前驱节点执行CAS操作失败都会执行unpark操作唤醒该线程)
1
2
3
4
5
6
7
8
9
10
11
12
13
|
public final void signal() {
if (!isHeldExclusively())
throw new IllegalMonitorStateException();
Node first = firstWaiter;
if (first != null)
doSignal(first);
}
|
出队操作
出队操作主要是将条件等待队列中的节点(null或未取消的选择节点)移除,并放入到AQS的同步等待队列中;其代码如下:
1
2
3
4
5
6
7
8
9
10
11
12
13
14
15
16
17
18
19
20
21
22
23
24
25
26
27
28
29
30
31
32
33
34
35
36
37
38
39
40
41
42
43
44
45
46
47
48
49
50
51
52
53
54
55
56
57
58
59
60
61
62
63
|
private void doSignal(Node first) {
do {
if ( (firstWaiter = first.nextWaiter) == null)
lastWaiter = null;
first.nextWaiter = null;
} while (!transferForSignal(first) &&
(first = firstWaiter) != null);
}
final boolean transferForSignal(Node node) {
if (!compareAndSetWaitStatus(node, Node.CONDITION, 0))
return false;
Node p = enq(node);
int ws = p.waitStatus;
if (ws > 0 || !compareAndSetWaitStatus(p, ws, Node.SIGNAL))
LockSupport.unpark(node.thread);
return true;
}
private Node enq(final Node node) {
for (;;) {
Node t = tail;
if (t == null) {
if (compareAndSetHead(new Node()))
tail = head;
} else {
node.prev = t;
if (compareAndSetTail(t, node)) {
t.next = node;
return t;
}
}
}
}
|
出队操作图示:
![出等待队列操作.jpg]()
signAll解析
将condition队列中所有node出队,逐个添加到CLH队列末尾,同时修改它们在CLH队列中前驱节点的状态为signal,这样不用在此处就唤醒该节点的线程,唤醒工程交给前驱节点去做
1
2
3
4
5
6
7
8
9
10
11
12
13
14
15
16
17
18
19
20
21
22
| public final void signalAll() {
if (!isHeldExclusively())
throw new IllegalMonitorStateException();
Node first = firstWaiter;
if (first != null)
doSignalAll(first);
}
private void doSignalAll(Node first) {
lastWaiter = firstWaiter = null;
do {
Node next = first.nextWaiter;
first.nextWaiter = null;
transferForSignal(first);
first = next;
} while (first != null);
}
|